
I am very excited to announce that I have been selected to work with a group of Stampin’ Up! Demonstrators from around the world and participate in a Brand NEW Blog Hop with them as a designer! All the blog posts will feature a FREE full tutorial on the project that they are featuring!
This Blog Hop we are featuring a Chocolate Dispenser! What great timing because we all have Christmas on our minds and there will be so many great ideas on hand made gifts!

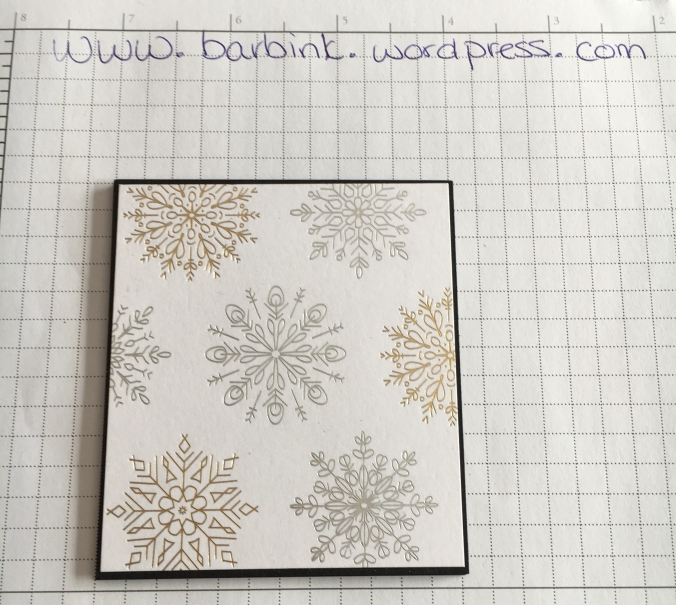
Here is what I am going to create with you:

Alright, let’s make this thing!
Step by Step Instructions:
1. Cut a piece of cardstock at 6 x 12, and then score parallel to the long edge at 1 “. Turn your cardstock and score at 3 ⅛”, 5 ¾”, 8 ⅞”, and 11 ½”, all along the short edge. Score above the 1” score line on the SECOND segment only at ¾”.

2. Cut out the 1 ¾” x 2 ¾” piece from the bottom of the second segment and cut out the ½” x 1” corner piece. Cut between the remaining 1”flaps. Fold along all of the score lines.

3. To create the lid cut a piece of cardstock at 4 ¼” x 4 ⅝” and then score along all sides at ¾”. Cut and taper all four corners. Fold along all of the scored lines.

4. Decorate the side panels as well as the top of the box lid.
For the lid:
- Cut one piece of Designer Series Paper (DSP) at 2 ⅞” x 3” for the top
- Cut 2 pieces of DSP at 2 ⅞” x ⅝” for two of the sides of the box lid.
- Cut 2 pieces of DSP at 3” x ⅝” for the remaining two sides of the box lid.

For the upper side panels:
- Cut 2 pieces of DSP at 3” x 3” for two of the upper side panels.
- Cut 2 pieces of DSP at 2 ½” x 3” for the remaining two of the upper side panels.
For the lower side panels:
- Cut 2 pieces of DSP at 3” x 2” for two of the lower side panels.
- Cut one piece of DSP at 2 ½” x 1 ¼” for the shorter lower side panel.
- Cut one piece of DSP at 2 ½” x 2” for the longer lower side panel.

Before adhering your panels, lay out all of your pieces to see where they all fit. Attach panels to unassembled box and lid.

I used Tombo glue to adhere all of my DSP pieces to the sides and the lid.
5. To create the base of the dispenser, cut a piece of chip board at 3” x 3 ⅜”. Also cut a piece of cardstock by the same dimensions.

Cut a piece of DSP at 2 ½” x 3” for the bottom of the dispenser where the chocolates will rest on.
Cut a piece of DSP at just under 3” and just under 3 ⅜” to place on top of the cardstock for the base of your dispenser to give it a finished look.
Glue the cardstock piece onto the chipboard, and then glue the DSP piece on top.
6. Assemble the box and lid, I used tombo glue, but you can also use tear tape. You just want to make sure that you use a really strong adhesive to keep your box and lid together.

7. Decorate as desired.
To create a clean edge around the side panels, I used silver metallic edged ribbon to separate the two different paper panels. I used tear tape to adhere it.
To create the lid topper, I punched out seven circles using the ¾” punch and glued them altogether one on top of the other. I then used dimensionals to attach the silver foil snowflake on top of the circles. Then, with our mini ornaments, I removed the hanging function on the top of the ornament and then flipped it upside down to create the bauble at the top. I used a hot glue gun to attach the mini ornament onto the foil snowflake.


To decorate the front of the box I cut a swirl out of Champagne foil from the Swirly Snowflakes thinlits, I used a gold foil snowflake and then I stamped the sentiment in Soft Suede using the stamp set Snowflake Sentiments. I punched out the sentiment with the Everyday Label punch, and sponged around it with Soft Suede, and then layered the sentiment with another Everyday Label punch that I punched out of Champagne foil. I then popped the sentiment onto the foil snowflake with dimensionals.


Here is a video I created to help put this project together:
Stampin’ Up! Products used:
- Black 12 x 12 cardstock
- Whisper white cardstock for sentiment and circle punches
- Year of Cheer Designers Series Paper
- Champagne foil
- Chip board for base
- Foil snowflakes
- Mini ornaments
- Silver metallic edged ribbon
- Swirly snowflakes thinlits
- Snowflake sentiments
- Simply Score board
- Everyday label punch
- ¾” circle punch
- Soft Suede ink pad
- Sponges
- Tombo glue
Now it is time to check out the next Demonstrator’s project on the Blog Hop


Here are the incredible members of the Thinking Outside of the Box design team:
Check out their blogs and see their great Chocolate Dispensers they created for our blog hop!
- Shannean Moncrief – Australia
- Tanja Kolar – Germany
- Yoshiko Yamada Endo – Japan
- Zoe Tant – United Kingdom
- Annette Elias – Netherlands
- Dena Plummer Rekow – United States
- Sharlene Meyer – New Zealand
- Beate Wacker – Austria
- Aude Barbara – France
- Barb Stewart – Canada (You are here)
Thank you for visiting! Remember to follow my blog if you are not already a follower!


I love your project Barb and the DSP and the ornament are so cute – ingenious use of the ornament! Your stamping and other elements are so beautiful. Thanks for sharing.
LikeLike
Thanks Shannean! I truly appreciate your kind words!
LikeLike
Oh my gosh! I knewed, that you fit perfect to our group, but seeing in real… you´re amazing. Thank´s that you are part our group.
Hugs from your german friend
Tanja
LikeLiked by 1 person
Thanks Tanya! Just jumped on the blog hop and loved what I saw! What a super talented group of ladies!
LikeLike
Pingback: Chocolate Dispenser Box Blog Hop & Tutorial | MagpieCreates
Oh your dispenser is beautiful Barb – so elegant! I love how you have used the ornament embellishment on top – so clever!
LikeLiked by 1 person
Thanks Sharlene! I was so happy with how that turned out!
LikeLike
Fabulous design Barb and so clever to use the ornament as the knob on the lid. Zoe x
LikeLiked by 1 person
Thanks Zoe!
LikeLike
Hey Barb, I love your Dispenser Box and the combination of this DSP with Basic Black Cardstock! I see so many great uses of products too! The idea to use the bauble on top of the lid is simply brilliant! Love to see your video!
LikeLiked by 1 person
Thanks Annette! I love using basic black as it does make things pop!
LikeLike
Barb–What a clever design!! Such a beautiful box and I love how you used the mini ornament!! So fun! Thanks for sharing!
LikeLiked by 1 person
Thanks Dena!
LikeLike
Love this! Thanks for the instructions.
LikeLiked by 1 person
You are welcome Deanna, so glad you like it!
LikeLike
Love this Box! What a great Idea for the topper 😀 Very elegant design with the black cardstock.
Greetings from Austria!
Beate
LikeLiked by 1 person
Thanks Beate! I appreciate!
LikeLike
Congradulations, this a project I will make. Thank you for the measurements & the beautiful design. It looks grand in real.
Jackie
________________________________
LikeLiked by 1 person
Thanks Jackie! I love how it turned out! Please feel free to share your creation!
LikeLike
I went through the entire hop, and yours is by far the most beautiful. Runner-up would be the blue and white one.
LikeLiked by 1 person
Thanks Susan, your kind words mean so much! I have been lucky enough to be asked to work with these talented ladies from around the world!
LikeLike